How to edit video to music Pro Tip
It’s no secret that well over half of the videos we watch incorporate music at some point. However, many new editors jump in without considering the music selection for the video, much less the most efficient way to start the edit with the music in mind. Today, we’re sharing a pro tip on how to use edit markers to quickly sync your edits to the music.
When I started video editing, one of the first things I learned was that choosing the right music and cutting your video to match it is about 75% of the job.
Now…This type of music driven editing is great for post-event or highlight videos for example, where the video is driven by the music and visuals.
So today we want to give a quick pro tip around how you can use edit markers within your editing software to rough cut your video to music.
While this article is centered around Adobe Premier Pro, the “markers” feature should be something that can easily be found in most video editing platforms.
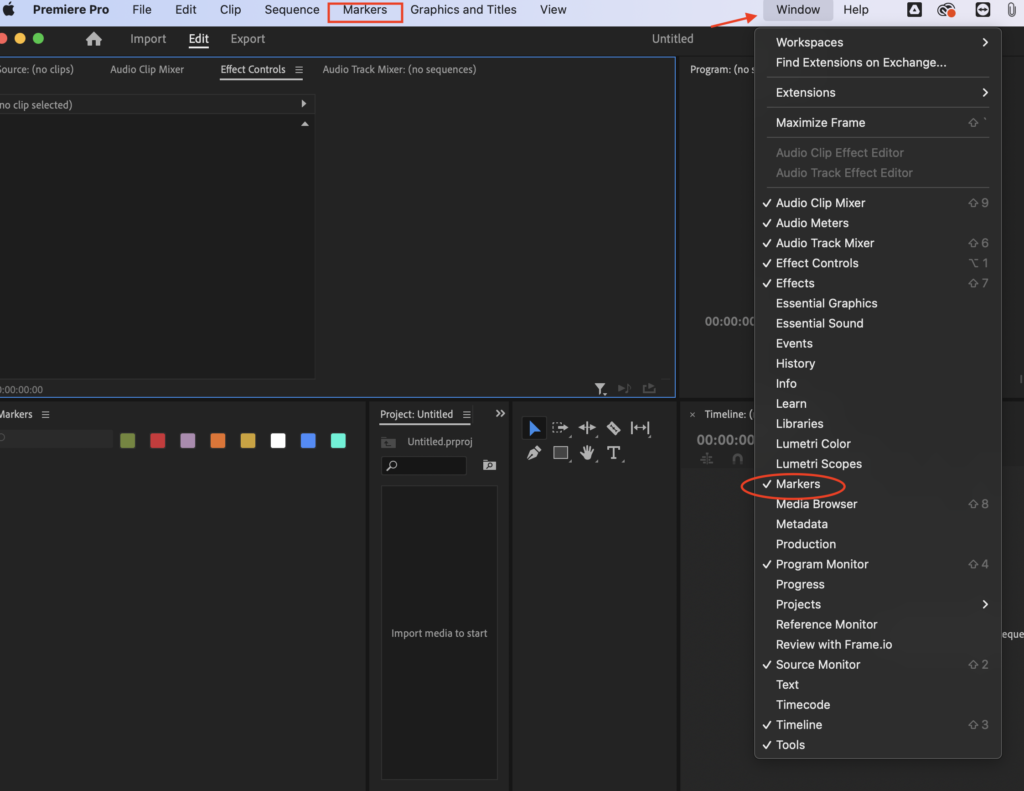
In Premiere Pro you can access your markers from a couple of different places. The Tool Bar and also from the Window menu on a Mac.

It’s worth mentioning that there are different marker types that we won’t get into in-depth but there are clip markers, sequence, and segment markers. We want to focus on placing these markers within the timeline sequence. So to do that just be sure you are in the sequence window and that you don’t have a clip (music or video) selected
All we want to do here is basically pull your track into the timeline. You are then going to play through the track “tapping M” (inserting) the markers to the beat of your music track.

The idea here is the simply tap out your markers — to the beat of the track — you may drop markers in on the downbeat, which may be your kick drum. You may choose to drop it in where the snares are hitting or high hats or anything that is helping to set up pacing and timing. This can be for the overall video or something building in a moment of the video.
Keep in mind you can alternate the instrumentation that you are tapping out your time to. Just be sure to give it a bit just to establish that instrument’s timing — for instance, I may tap at the kick for a little while just to establish that, and then, if I change to say the high hat pattern or the snare pattern would tap those out for a few beats so that the viewer can get a feel for, what I’m tapping to musically. This is important because if you haven’t figured it out yet, these markers are the places where we will eventually make our video cuts.
The purpose here is to establish some type of pattern that the viewer will feel when they’re watching your video. Viewers don’t necessarily have to be people who are musically inclined, but we hear music all the time — we interact with video that is oftentimes set to music — as a result people will feel disjointed and disconnected if the music and cuts don’t sync to create continuity. Even if they don’t necessarily know why they feel that way.
Like I said, in the beginning, 75% of the job of creating a good video is going to be choosing a good piece of music for the mood, feeling, and emotion that I’m trying to convey. I want to ensure my visuals are actually cut to that music in such a way that makes the video enjoyable to watch and that there aren’t distractions to my content’s message.
Now, once I have set these markers in my timeline the next step is simple. I’m going to take the video selects (or footage) and drag and drop them to the marker points. You don’t necessarily have to have a new clip on every marker that will depend largely upon how you want to pace your video overall.
This is a quick way to establish the rough cut — speed up productivity and establish a road map of where you’re trying to go with the edit. Of course, you don’t always have to cut to the things that are musical representations in the track many times cutting to sound effects that may already be in your music track or sound effects or visuals that you add later are also great edit points for making your cuts.
All right guys hope you enjoyed this quick tutorial about using edit markers to cut your video to music for other tips and tricks please join our newsletter and subscribe to our YouTube channel.


